Quick ID Summary — What to look for first
If you suspect carpenter ants in or around your home, you want definitive, observable clues fast. Carpenter ants (genus Camponotus) are among the largest common household ants. They don’t eat wood like termites — they excavate it to make galleries. Below are the immediate visual cues that tell you you might be dealing with carpenter ants.
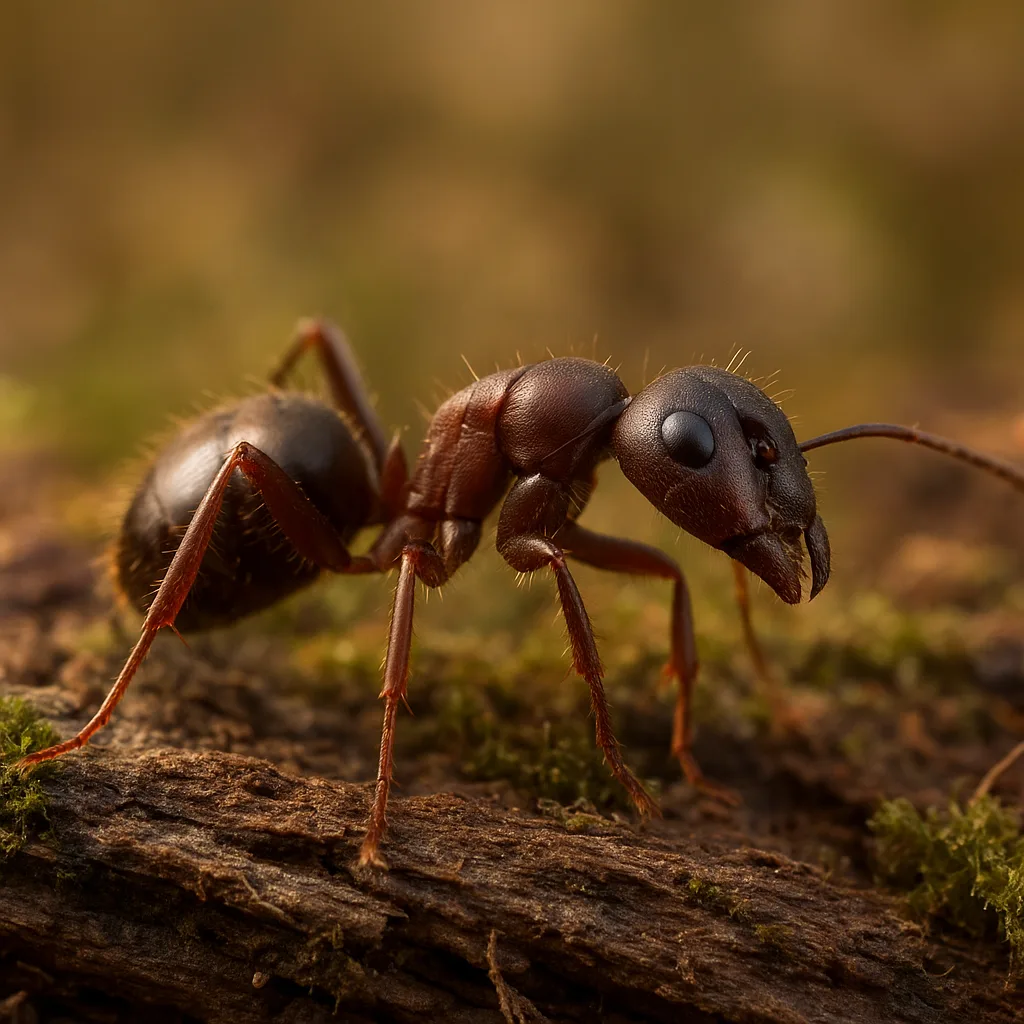
- Size: workers typically 6–13 mm (0.25–0.5 in); queens 16–25 mm (0.6–1.0 in).
- Color: often black, dark brown, red-black, or bicolored (red head & black abdomen in some species).
- Body shape: a single rounded petiole (one node) between thorax and abdomen and a smoothly arched thorax.
- Galleries and frass: smooth, clean galleries in wood and piles of sawdust-like frass (wood shavings) including insect parts.
- Behavior: often nocturnal foragers, workers 5–30 m from nest; winged reproductives (swarmers) in spring/early summer.
Physical characteristics: workers, queens, and males
Close observation of body parts, size, and color is the most reliable way to separate carpenter ants from look-alikes. Use a hand lens (10–20x) or a macro photo — Orvik’s visual ID can speed this up by comparing your photo to a vetted database.
Workers
- Size: 6–13 mm (0.24–0.51 in), depending on species and caste.
- Color: uniform black, two-toned (e.g., red head, black gaster), or brownish; some species are metallic.
- Thorax: smoothly rounded, often humped when viewed from the side (a key characteristic of Camponotus).
- Petiole: single node (one bump) between thorax and abdomen; visible when viewed from the side.
- Antennae: elbowed (geniculate) with 12 segments in workers; no club at the end.
Queens (how to identify a queen carpenter ant)
- Size: 16–25 mm (0.63–0.98 in) — noticeably larger than workers.
- Appearance: wing scars or wings (if virgin or newly mated); more robust thorax from having flight muscles.
- Behavior: queens stay in or near nests after founding; seeing many large ants in a gallery or large winged ants during swarming season suggests queens are present.
Males (alates)
- Size: similar to or slightly smaller than queens but with more slender bodies and wings when present.
- Color: often darker and more fragile; wings are proportionally long and translucent.
Carpenter ants vs other insects: how to tell them apart
Searches like "how to identify a carpenter bee" or "how do you identify carpenter ants" often show mixed results because people commonly confuse carpenter ants with carpenter bees, termites, or other ant species. Here’s how to distinguish them.
For more on this topic, see our guide on Spotting the Queen Bee: A Field Guide.
Carpenter ants vs carpenter bees
- Body: Carpenter bees (genus Xylocopa) are robust, hairy, and look more like bumblebees; carpenter ants have a narrow petiole and segmented body with little hair.
- Holes: carpenter bees create neat, circular entrance holes (≈12–20 mm / 0.5–0.8 in diameter) on the exterior of wood and do not leave frass piles; carpenter ants make galleries internally and push frass out as sawdust-like piles.
- Wings and flight: carpenter bees fly during the day; carpenter ant swarmers fly in spring/early summer and are ants with elbowed antennae, not bees.
Carpenter ants vs termites
- Body shape: termites have thick, uniform waists; ants have constricted waists (petiole). Termite wings are equal length; ant swarmers have unequal wing pairs with shorter hind wings.
- Damage: termite damage is packed galleries with mud tubes (for subterranean termites) and often crumbling, layered wood; carpenter ant galleries are clean-sanded and follow wood grain, leaving smooth chambers.
Carpenter ants vs other ants (odorous house ants, pavement ants)
- Size: carpenter ants are substantially larger (workers 6–13 mm) than odorous house ants (2–3 mm) or pavement ants (2.5–4 mm).
- Thorax profile: carpenter ants’ thorax is smoothly rounded in profile; many smaller ants have a flattened or uneven thorax.
Signs of carpenter ant presence and damage
Carpenter ants don’t eat wood; they remove it, creating galleries that can weaken structures. Early detection limits damage. Look for these diagnostic signs.
- Frass piles: tiny piles of coarse sawdust mixed with insect parts and sometimes dead ants, often near holes, vents, or baseboards.
- Gallery characteristics: smooth, clean tunnels following wood grain. Galleries can be several centimeters wide and extend behind trim, under stairs, inside siding, or around windows.
- Rustling sounds: faint tapping or rustling inside walls at night when a large colony is active.
- Foraging trails: workers in single-file lines on foundations, along tree branches, or on indoor surfaces, usually at night.
- Winged swarmers: winged males and females in spring (May–July in temperate North America). Finding discarded wings indoors suggests an indoor colony.
Habitat, geographic distribution, and seasonal behavior
Carpenter ants in the genus Camponotus are widespread across much of the Northern Hemisphere. Understanding their ecology helps predict where to look.
You may also find our article on Identify That Spider: A Practical Field Guide helpful.
- Geographic range: common across North America, Europe, and Asia. In eastern North America, Camponotus pennsylvanicus (black carpenter ant) is widespread; Camponotus modoc and Camponotus herculeanus occur in western regions.
- Nesting sites: moist, decayed, or hollow wood (stumps, logs, attic joists, window frames). Colonies often begin in moist wood and may later develop dry satellite nests.
- Microhabitat: under bark, in tree cavities, between siding and framing, in wall voids, insulation, and even hollow porch posts.
- Seasonality: foraging peaks in warm months. Winged reproductives typically swarm in spring to early summer (timing varies regionally). Large foraging activity often occurs at dusk and at night.
Practical field inspection: step-by-step identification and tools
Follow this methodical checklist to confirm carpenter ants. Use gloves, a flashlight, a hand lens, and optionally a camera to document evidence. Orvik’s AI-powered visual ID can help validate your photos and provide species-level suggestions faster.
- Begin outdoors: inspect the foundation, siding, window frames, roofline, and nearby trees for trails, entry holes, and frass.
- Locate active trails: follow them to nest entry points — trails often lead up tree trunks, down eaves, or into cracks.
- Check for frass and exit holes: photograph piles and holes for later analysis or Orvik upload.
- Examine interior: inspect baseboards, attics, crawl spaces, and behind wall voids for sounds, sawdust, or wings.
- Collect a specimen: if safe, capture a live worker in a sealed container for magnified inspection or to submit to Orvik for visual ID.
- Document details: note numbers (rough count of workers seen), times of activity, and exact locations (distance from ground, type of wood, moisture level).
Safety notes:
You might also be interested in Goji Berries: A Field Guide to the Red Superfruit.
Related reading: Reading Larvae: A Practical Field Guide.
- Do not block suspected nest openings or spray blindly into wall voids — this can redirect ants and make control harder.
- Wear gloves and eye protection if breaking into wood to inspect galleries.
How to identify and get rid of carpenter ants — effective control steps
People searching "how to identify and get rid of carpenter ants" usually want both accurate identification and practical removal steps. Below is an integrated approach combining non-chemical and chemical options. If you prefer a quick field ID first, upload clear photos to Orvik to confirm species and get recommended next steps.
Non-chemical / exclusion controls
- Dry and ventilate: reduce moisture by repairing leaks, improving ventilation, and using dehumidifiers in crawl spaces or attics.
- Remove nectar/food sources: trim tree branches and vines away from the house, store food properly, and clean up pet food and crumbs.
- Seal entry points: caulk gaps, repair damaged shingles, replace rotted wood, and fit door sweeps. Seal cracks larger than 2 mm (ant size) with appropriate materials.
- Remove infested wood: if a localized piece of structure is heavily damaged (rotted sill or porch post), replace it after treating surrounding area.
Targeted chemical controls
- Baits: slow-acting protein or carbohydrate baits with boric acid, fipronil, or hydramethylnon can be effective. Place baits along foraging trails and near nests; allow workers to carry bait back to the colony.
- Direct nest treatment: for visible galleries, apply labeled dust insecticides (boric acid dust, silica aerogel, or diatomaceous earth where appropriate) or foam formulations into voids following label instructions.
- Perimeter treatments: professional-grade liquid insecticides (pyrethroids, neonicotinoids, or fipronil) applied around foundations can reduce foraging ants but should be used as part of an integrated plan.
When to call a professional
- Widespread structural damage or multiple satellite nests.
- When chemical treatments are required in wall voids or attics/wall spaces that you cannot access safely.
- If you prefer a warranty or inspection reports for insurance or resale.
Safety and toxicity warnings
- Always read and follow the pesticide label — it is the law and contains critical safety and first-aid information.
- Keep baits and insecticides out of reach of children and pets; consider locked bait stations for bait placement in homes with pets or children.
- Some products (neonicotinoids, synthetic pyrethroids) are toxic to pollinators and aquatic life. Avoid spraying flowering plants or allowing runoff into water bodies.
- For dusts and aerosols, use appropriate PPE (gloves, goggles, respirator) if manufacturer recommends it.
Prevention and long-term monitoring
Preventing reinfestation is often more cost-effective and safer than repeated pesticide applications. Maintain a program of habitat modification and monitoring.
- Regular inspections: check eaves, attics, crawl spaces, and baseboards every 3–6 months, more frequently in spring and summer.
- Moisture control: repair roof leaks, divert downspouts away from foundations, and maintain proper grading (soil slopes away from building at least 5% over the first 1–2 m).
- Wood management: keep firewood 30–60 cm off the ground and 10–15 m from buildings; dispose of tree stumps and decaying wood near the house.
- Monitor baits and traps: maintain bait stations seasonally and replace baits when consumed or degraded by humidity.
- Use Orvik for ongoing ID: photograph any new ant encounters and use Orvik’s comparative analysis to spot early reinfestation before damage escalates.
Frequently Asked Questions
- How do you identify carpenter ants?
- Look for large ants (workers 6–13 mm), a smoothly rounded thorax, a single petiole node, dark colors (black or red-black), frass piles of wood shavings, and galleries in wood. Night foraging and winged swarmers in spring are additional clues.
- How can I tell a carpenter ant from a carpenter bee?
- Carpenter bees are bee-like, hairy, and create round exterior entrance holes (~12–20 mm) and do not leave frass piles. Carpenter ants are slimmer, have elbowed antennae and leave sawdust-like frass from internal galleries.
- What does carpenter ant damage look like?
- Damage appears as smooth, sanded galleries following wood grain, hollowed-out chambers, and piles of coarse sawdust-like frass—often starting in moist or decayed wood.
- How do I get rid of carpenter ants safely?
- Use an integrated approach: reduce moisture, seal entry points, remove infested wood, and use targeted baits or nest treatments. Follow pesticide labels carefully and call a licensed professional for extensive infestations.
- How can I identify a queen carpenter ant?
- Queen carpenter ants are noticeably larger (16–25 mm), have a more robust thorax (often with wing scars or wings), and are generally found within or very close to a nest rather than foraging.
- Can an app help me identify carpenter ants?
- Yes. Orvik and similar AI-powered visual ID tools can analyze photos against species databases to help confirm carpenter ants and recommend next steps for inspection or control.