When someone searches for "tree identification by photo" they want a reliable answer fast: what species is this, where it grows, whether it's safe, and how confident that ID is. This guide explains how to photograph trees for the best results, what visual cues experts use (leaf shape, bark texture, buds, fruit, silhouette), how AI tools like Orvik work with your images, and practical comparison checks to tell commonly confused species apart.
1. Why good photos matter for tree identification
A clear photo can narrow identification from thousands of species to a handful. Poor images — blurred leaves, indistinct bark, or no scale — make even the best AI or human expert guess. Good photos improve confidence, reduce false positives, and save field time.
- AI accuracy increases sharply when multiple features are visible (leaf + bark + fruit).
- Well-lit, in-focus close-ups of diagnostic parts reduce confusion between similar species.
- Geographic and seasonal context (location, time of year) further refines ID.
2. How to photograph a tree for reliable identification
Follow a systematic photo protocol. Treat the tree like a case file: collect standard shots so an AI or botanist can cross-check features.
- Whole-tree context: stand back 10–50 m (depending on tree size) and capture the crown silhouette against the sky.
- Leaf/needle close-up: photos showing upper and lower surfaces, petiole, margin, and tip. Include a coin or ruler for scale (leaf length in cm).
- Bark close-up: focus on texture, fissures, plates, and any peeling. Shoot at arm's length (50–100 cm) with raking light if possible.
- Buds and twigs: shoot terminal/axillary buds and arrangement (opposite vs alternate) in late fall/winter when leaves are absent.
- Fruit, flowers, or seeds: photograph entire clusters and close-ups showing size and attachment points (acorns, samaras, cones).
- Root flare and base: many species have distinct trunk bases (e.g., buttresses on Platanus occidentalis).
- Tips: use a tripod or steady hand; shoot at eye level for bark; avoid heavy backlighting for close-ups.
- Image quality: 8+ megapixels is ideal; keep photos original (don’t over-compress).
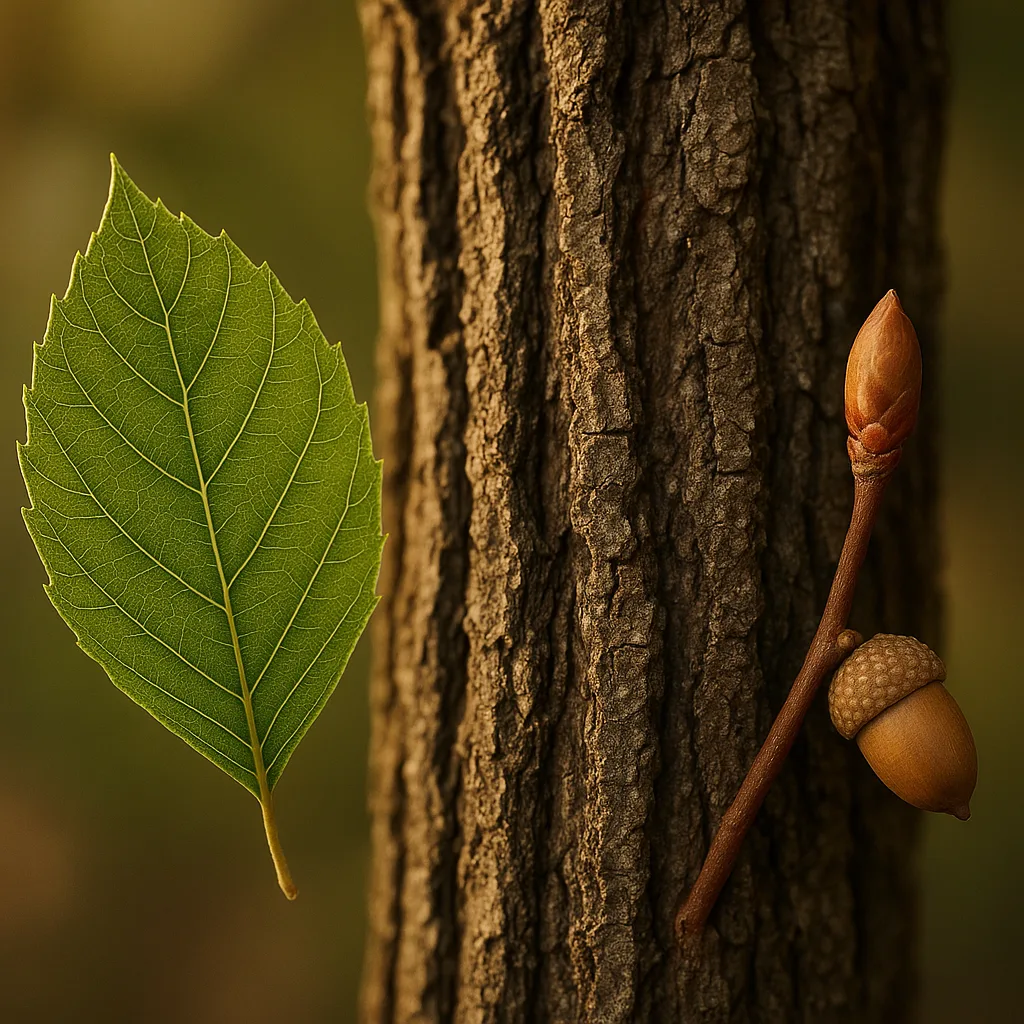
3. Key photographic features to capture (and what they tell you)
Different features are diagnostic at different taxonomic levels. Capture a range to ensure a correct ID.
Leaves and needles
- Shape and size: simple vs compound; leaf length in cm (e.g., oak leaves 7–20 cm, ash leaflets 5–12 cm).
- Margin: serrated, entire, lobed (e.g., Acer platanoides leaves with 5 lobes vs Quercus robur with deep sinuses).
- Arrangement: alternate (oak, birch), opposite (maple, ash), or whorled (some conifers).
- Needle attributes: length (mm), number per fascicle (Pinus strobus 5 needles per bundle vs Pinus sylvestris 2), cross-sectional shape (flat vs square for pines vs spruces).
Bark
- Texture: smooth (Fagus sylvatica), flaky (Betula spp.), furrowed (Quercus spp.).
- Color and patterns: cinnamon-brown, grey, white with lenticels.
- Age-related changes: younger bark often smooth; older bark fissures can be 1–5 cm wide or form deep furrows >10 cm on mature oaks.
Twigs and buds
- Bud shape: ovoid, pointed, or rounded (e.g., Liriodendron tulipifera has distinctive large terminal buds).
- Arrangement: opposite vs alternate — critical for separating maples (Acer) from oaks (Quercus).
Fruits and seeds
- Form: samaras (Acer), acorns (Quercus), cones (Pinus, Picea), nuts (Juglans).
- Size metrics: acorns often 1.5–3.5 cm, samaras 2–6 cm long, pine cones 3–30 cm depending on species.
Silhouette and habit
- Shape: columnar (Populus nigra 'Italica'), pyramidal (Pinus sylvestris), broad-spreading (Quercus robur).
- Height: small understory trees 3–10 m; mature canopy trees often 15–40 m depending on species.
4. Using AI and apps: workflows, strengths, and limits
AI tools like Orvik combine visual features with geographic and seasonal metadata to suggest species. They rapidly narrow possibilities and provide confidence scores, but they're not infallible.
For more on this topic, see our guide on Identify Trees from Photos: Expert Guide.
- Typical workflow: take 4–6 diagnostic photos → upload to an app (Orvik) → review top suggestions with confidence percentages → verify using distribution maps and field guides.
- Strengths: speed, large image databases, pattern recognition beyond human perception.
- Limitations: confusion with hybrids, cultivars, juvenile forms, and images lacking diagnostic parts (e.g., only a twigless trunk).
Best practice is to use AI as an aid, not the final arbiter. After Orvik suggests an ID, cross-check with local range maps and two or three visible diagnostic traits (leaf arrangement, fruit, bark). If uncertain, submit multiple images or consult local botanists or herbarium resources.
5. Common lookalikes: how to tell them apart
Many misidentifications occur between species with similar leaves or bark. Here are practical comparisons with quick visual checks.
Maple (Acer) vs Oak (Quercus)
- Leaf arrangement: Maples have opposite leaves; oaks have alternate leaves.
- Leaf lobing: Maples typically have palmate lobes with distinct sinuses; oaks have lobes that may be rounded or pointed depending on white or red oaks.
- Fruit: Maples have paired samaras; oaks have single acorns in cups.
Pine (Pinus) vs Spruce (Picea)
- Needles: Pines in bundles (fascicles) of 2–5; spruces have single needles attached to pegs and roll or snap when bent.
- Needle cross-section: Pine needles are soft/flattened; spruce needles are square in cross-section and sharp.
- Cones: Pine cones often larger (5–30 cm) and fall intact; spruce cones are smaller (4–15 cm) and disintegrate on the branch.
Birch (Betula) vs Alder (Alnus)
- Bark: Birches often have white papery bark that peels in strips; alders are grey to brown with less papery exfoliation.
- Fruit structures: Alders have persistent woody cones (1–3 cm); birch catkins are longer and pendulous.
Ash (Fraxinus) vs Hickory (Carya)
- Leaf type: Both are pinnate; count leaflets — ash commonly 5–9 leaflets, hickory 5–17 but often with larger, asymmetric leaflets.
- Fruit: Ash has a single samara per fruit; hickory produces hard-shelled nuts.
6. Seasonal and habitat clues that aid ID
Time of year and location are powerful clues. Many features are seasonal: flowers and fruits appear in specific months, and leaf-out/leaf-fall timing can be diagnostic.
- Phenology: note month — sugar maple (Acer saccharum) flowers in early spring; oak acorns mature late summer to autumn.
- Latitude/elevation: boreal conifers (Picea, Larix) dominate above ~50°N or at high elevations; tropical species will not appear in temperate zones.
- Habitat: riparian species (Populus, Salix) prefer saturated soils; dry ridge species (Quercus alba) prefer well-drained soils.
Example: a tree with pinnate leaves found in a dry limestone ridge in the central U.S. is more likely Carya ovata (shagbark hickory) than Fraxinus americana, depending on leaflets and bark.
You may also find our article on Identify Plants Fast: Expert Guide to Free Apps helpful.
7. Safety, toxicity, and ethical considerations
Identifying a tree has practical safety implications. Some trees are toxic by touch or ingestion, others are protected by law. Photographing often carries low risk, but field safety matters.
- Toxic species to beware of: Taxus baccata (yew) — all parts except aril are highly toxic; Toxicodendron radicans (poison ivy) causes contact dermatitis via urushiol.
- Do not taste or handle unknown fruits or sap. Seeds and berries (e.g., Aesculus hippocastanum — horse chestnut) can be toxic to children and pets.
- Legal protections: some trees may be protected (old-growth, veteran trees, or species in protected areas). Do not remove parts without permission.
Field safety checklist:
- Wear gloves if handling twigs or fruits.
- Avoid confined spaces under dead branches and be aware of overhead hazards.
- Stay on public paths or seek permission before entering private land for photographs.
8. Advanced tips, troubleshooting, and next steps
If a photo-based ID is ambiguous, use these advanced strategies to improve or confirm results.
Looking beyond this category? Check out Master Rock ID: Expert Guide to Stones.
- Collect multiple seasonal photos: winter buds, spring flowers, summer foliage, and autumn fruiting bodies.
- Use a field guide keyed to your region (e.g., "Flora of North America" or local herbarium keys) to compare diagnostic traits.
- Record metadata: GPS coordinates, elevation, soil type, and associated plant community — upload these with photos in Orvik to increase AI accuracy.
- If possible, make a voucher: press a leaf sample for herbarium confirmation, following local regulations.
Troubleshooting common issues:
Related reading: Identify Plants Fast: Expert Guide to Flora Apps.
- Blurry close-ups: retake using macro mode or switch to higher shutter speed.
- Overexposed backlit leaves: use fill flash or change angle to reduce direct sky behind the leaf.
- Juvenile vs mature forms: juveniles may have different leaf shapes—capture multiple age classes present.
Orvik and similar apps can expedite ID, but always verify suggested names against field features and distribution. For critical uses (e.g., forestry management, conservation), follow up with a professional botanist or local extension service.
Conclusion
Tree identification by photo is practical and powerful when you combine good photographic technique, knowledge of diagnostic features, habitat context, and modern AI tools like Orvik. A systematic approach—capturing leaves, bark, buds, fruit, and whole-tree habit—yields the best results. Use AI suggestions as a starting point, verify with field traits and local range, and be mindful of safety and legal considerations when working in the field.
With practice, you'll go from "What tree is this?" to confident, evidence-based identifications from photos.
Frequently Asked Questions
- Can I identify any tree from a single photo?
- A single clear photo can often identify common species, but multiple photos showing different features (leaves, bark, fruit, buds) and habitat greatly increase accuracy. Some species require season-specific traits for a confident ID.
- What photos should I always take for best results?
- Take a whole-tree shot for context, close-ups of leaves/needles (top and underside), bark, buds/twigs, and any fruits or flowers. Include a scale object like a coin or ruler.
- Does Orvik need internet or can it work offline?
- Orvik typically uses cloud-based AI models for the most accurate matches, so internet connection helps. Some apps offer limited offline reference databases, but offline IDs may be less precise.
- How accurate are AI tree IDs from photos?
- Accuracy varies by species and image quality. For well-documented species in the app's database and with diagnostic photos, top-1 accuracy can be high (>85%), but lookalikes, cultivars, and hybrids reduce reliability—verify suggested IDs.
- How do I identify trees in winter when there are no leaves?
- Photograph buds, twig arrangement (opposite vs alternate), bark texture, and remaining fruits or seed pods. Bud shape and position can be diagnostic for many deciduous trees.
- Are there safety concerns when photographing trees?
- Yes. Avoid touching unknown plants (poison ivy, yew toxicity), don't climb unstable trees, and respect private property and protected areas. Wear gloves when handling samples and never ingest unknown berries.
- What if the AI suggests multiple species with low confidence?
- Collect more images showing additional diagnostic traits, note the location and habitat, and consult a regional field guide or local botanist. You can also submit a voucher specimen to a herbarium for confirmation.
- Can tree identification by photo help with conservation or forestry decisions?
- Photo-based IDs are useful for surveys and inventories, but for legal or management decisions you should confirm identifications with expert verification, especially for protected or regulated species.